Showing posts with label Practice. Show all posts

Thursday, 7 April 2016

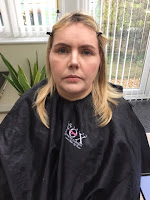
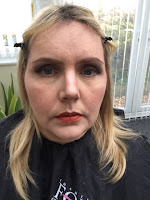
Character 2: Mrs Laderman. Step by step.

Products Used (in order):

  • Benefit's 'Porefessional' Primer
  • Kryolan Ultra Foundation
  • Kryolan Concealer Palette
  • Illamasqua Translucent Powder
  • Kryolan Glamour Glow Palette
  • Benefit Brow Zing (Medium)
  • Mac Cool Neautral Palette
  • Benefit 'Roller Lash' Mascara
  • Kryolan Creme Liner
  • Kryolan Lip Palette
  • Kryolan Cinewax
  • Kryolan Supracolor (Red and Black)
  • Kryolan Transparent Blood (dark)

Step by Step:
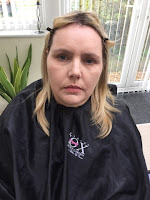
 1. First, I prepared the skin using cleansing, toning and moisturising. I then applied Benefit's 'Porefessional' primer to help reduce the appearance of fine lines in the make-up.
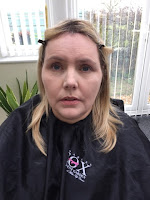
 2. I then applied the base, which I firstly used Kryolan's Ultra foundation and conealer from the concealer palette. I blended this in well with a kabuki brush before setting it with Illamasqua's Translucent Powder to prevent the fine lines from being visible. I then warmed up the skin tone and contoured the face using bronzer, highlighter and blush from the Kryolan Glamour Glow Palette.
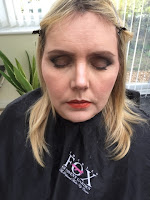
 3. I filled in and shaped the eyebrows using Benefit's 'Brow Zing' and an angled brush.

 4. I created a soft smokey eye using black, dark brown, light brown and white shades from the Mac 'Cool Neautral' palette.
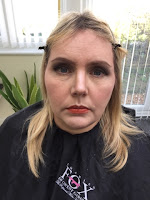
 5. I then applied Kryolan's Creme Liner in Ebony and Benefit's 'Roller Lash' Mascara on the lashes.

 6. I then applied a orangey-red lipstick to the lips (Kryolan's Lip Palette) as I felt this particular shade of red complimented my model's skin tone.
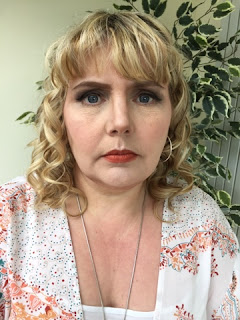
 7.  I curled the hair all over, alternating in direction. using a curling wand which I loosely teased out with my fingers and hairsprayed.
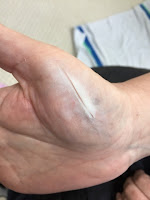
 8. I then moved on to the cut hand, which I firstly applied and blended the edges of Cinewax and cut down the middle with a spatula.
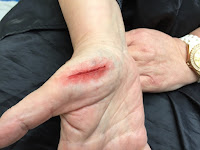
 9. I then applied red greasepaint around the cut with a soft brush for a light application. I then used a small refined brush to add red inside the cut.
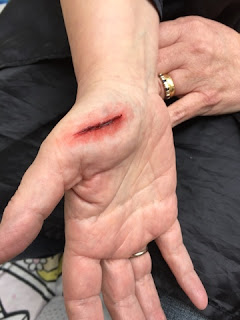
 10. I then applied a small amount of black greasepaint inside the cut with a small refined brush and then used to same brush to add dark transparent blood inside the cut.

Health and Safety:
  • Decant all product on to a palette before use.
  • Make sure all electrical equipment is PAT tested.
  • Use spray products such as hairspray in a well ventilated room.
  • Use disposable wands when applying mascara.

Evaluation of practice:

Overall I am very happy with the outcome of this practice. The one thing I would change about the overall look is that I would concentrate more on an even application of the eyeshadow above the eyelid so that the colour is more consistent. The thing I am happiest with the most is the cut on the hand, although like the eyeshadow, I would like the colour application to be slightly more consistent/smooth.
Character 2: Mrs Laderman - Initial Designs + Feedback


Above is my initial designs that I had included in my presentation.

Idea 1 - For this design I went for a make-up that was quite simple as I was going to make the hair the main focus of the design. Bold lips, simple eyes and voluminous sweeping hair for a subtle hint of the 80s. After completing my design, I considered how I could take it further with more interest and more of an obvious nod towards an 80s influence.

Idea 2 - Here I toned down the hair slightly and created a bold, strong 80s eye. After drawing up my design, I realised this would probably look too over the top and comical for my character and that I would need to reconsider my '80s' approach in a way that would create a happy medium.

Idea 3 - After looking at 80s Madonna for influence due to her being an icon, I realised that the late 80s featured a more smokey eye effect which creates a strong impact without the extreme bright colours around the eyes seen in the early part of the era. After considering the fact that my model has a fringe, I decided to go for the strong messy curls as seen on late 80s Madonna which I felt complimented my model's own hair. From this the hairstyle is easy to approach with styling, compliments the overall look and has a good impact. I included hoop earrings in my design as drawing it inspired me to include this in the styling to complete the look.


http://www.kurs-makijazu.pl/z-makijazem-przez-wieki/. (2015). [image] Available at: http://Madonna Hair [Accessed 7 Apr. 2016].

80s Madonna Make-up. (n.d.). [image] Available at: http://www.simplyeighties.com/madonna-fancy-dress.php [Accessed 7 Apr. 2016].


Character 1: Claudia. Hair & Make-up Step by step.

Products Used (in order):
  • Illamasqua's Matte Primer
  • Kryolan Ultra Foundation
  • Kryolan Concealer Palette
  • Illamasqua Translucent Powder
  • Kryolan Glamour Glow Palette
  • Benefit Brow Zing
  • Mac Cool Neautral Palette
  • Max Factor 2000 Calorie Mascara
  • Kryolan Creme Liner
  • Kryolan Lip Palette
  • Kryolan Transparent Blood (dark)


Step by Step:

 1. First, I prepared the skin by cleansing, toning and moisturising. I then used Illamasqua's matte primer.

 2. After, I applied Kryolan's ultrafoundation over the face and neck using a foundation brush and then blended it with a kabuki brush. I concealed any dark shadows and imperfections with kryolan's concealer palette. I then powdered over the face with Illamasqua's translucent powder. I contoured the face using Kyrolan's Glamour Glow where I applied a natural amount of bronzer, highlight and blush.

 3. I filled in the eyebrows with Benefit's 'Brow Zing' in the shade 'medium'/
 4. I applied eyeshadow with a cat-eye effect using black, dark brown, light brown and white from the Mac Cool Neautral palette, creating a ombre effect.

 5. I applied mascara on the top and bottom lashes using Max Factor's 2000 Calorie Mascara. I then applied Kryolan Creme Liner in Ebony.

 6. I applied a soft pink shade of lipstick to the lips, using Kryolan's Lip Palette.
 7. I then started with the hair, which I created by back-combing the front of the hair, parting it down the middle at the back. Then I plaited the two halves, crossed them over the top of the head and pinned them together.

 8. I then took the two strands that I purposely left out, and curled them using a curling wand.

 9. I then applied blood to my model's hands and spattered blood on her face using a brush. I then finished off by applying blood to my own hand and making a blood print on her face. This is the finished look.


Health and Safety:
  • Decant all product on to a palette before use.
  • Make sure all electrical equipment is PAT tested.
  • Use spray products such as hairspray in a well ventilated room.
  • When flicking product on to the face, ensure model's eyes and mouth are closed during.
  • Use disposable wands when applying mascara.
Evaluation of practice:

Overall, I am very happy with my practice and the outcome. In the future I will work on ensuring the eye make-up and eyebrows are more even to refine the look.

Monday, 4 April 2016

Character 1: Claudia - Initial Designs + Feedback


Above is my initial design ideas and then my final idea that I had decided on for my class presentation.

Idea 1 - for my first idea, I went for a simple feminine hair and make-up as I felt it closely fitted with how the characters from Scream Queens might typically look. 

Idea 2 - After looking at it, I decided that I would like to do something with the hair that was a bit more visually interesting as well as a bit more preppy. I felt adding adding a very subtle smokey eye might make her more sinister in appearance. After looking at it, I realised that although it fitted with my intended type of visual outcome, it still looked too pretty and innocent and I was going to have to go with with something a bit more dramatic with the eyes if I want my character to have a sinister look.

Idea 3 - I decided that winged smokey eye makes a much better impact to the eye shape to help it look more mysterious and slightly less girly, to suggest something is up.


Feedback:

As my initial intended scene for my character would be an establishing one, my designs included no special effects which is something that is essential to the brief. My teacher advised my that I find a way to include some special effects, therefore I decided to change my character's scene to a post-murder one, which meant I would have more of a open approach.

Monday, 14 March 2016

Technical File - Step by Step of my Assessment, Practice on Myself and a Product List


Product List:

Hair:

Denman brush
Pintail Comb
Bobby pins (dark brown)
Thin hairbands (dark brown)
Heated Rollers
Hairspray
Sectioning clips

Make-up:

Pre-made, pre-painted Latex Prosthetic
Cleanser, toner, moisturiser
Illamasque Matte Primer
Kryolan Cinewax
Kryolan Liquid Latex
Kryolan Creme Foundation Palette
Kryolan Supracolor (Red)
Illamasqua Translucent Powder
Rimmel Long Lasting Mascara
Dental Fang Prosthetic


Step by Step

  1. Remove any make-up that my model has on by cleansing, toning and moisturising. Allowing it to soak into the skin while I move on to the hair.
  2. Section the front half of the hair and clip it forward to separate it from the back.
  3. Take the back section of the hair and put it a neat ponytail on the center of the back of the head.
  4. Plait the pony tail and tie it off with hair band.
  5. Twist the plait around on itself, into a bun shape and secure it with bobby pins.
  6. Part the front section of the hair down the middle and directionally set the hair with heated rollers.
  7. While the rollers cool and set, begin the make-up.
  8. Apply a matte primer on the skin (I will use a foundation brush for this to maintain good cleanliness).
  9. Apply Cinewax on to the eyebrows and smooth it down with a spatula (this is to protect the eyebrows from adhesive and to flatten any areas that are not covered by the prosthetic). 
  10. Apply an adhesive around the edges of the prosthetic. For my assessment I chose to use liquid latex as it's easy to remove and works well my with my thin latex based prosthetic and a heavy duty one is not necessary. 
  11. After leaving the liquid latex after a short time to allow it to get slightly tacky, I apply the prosthetic to the face, so the the bottom middle sits just above the bridge of the nose and the sides sit just before the crease of her eyelids to ensure her eyes can still open with ease and is comfortable and central. 
  12. Once the liquid latex is dry and the prosthetic is stable, I blend out the edges with liquid latex and a cotton bud to make it a smoother transition from the prosthetic to the skin. I then dry this with a hairdryer. 
  13. I then apply my base make-up (Kryolan creme foundation) all over the face and over the latex edges and partially on to the pre-painted prosthetic to further help with blending.
  14. I then use darker shades of foundation (which were also used on the prosthetic) to add depth and contour the face which I blend out thoroughly but try to match the visual impact of the prosthetic to help it to not look out of place. 
  15. I then powder over the whole base using Illamasqua translucent powder to set it. 
  16. I then apply Kryolan red greasepaint on the the lower and upper eyelids and the lips which I blend with my finger to give it a natural appearance which I then set with translucent powder too to avoid creases. 
  17. Lastly, I apply a light amount of black mascara on to the lashes to add a bit of subtle depth to the eyes. 

  18. Once the make-up is complete, I move back on to the hair where I remove the heated rollers and lightly dress out the hair. 
  19. Using a pintail comb, I encourage the sides of the hair wave forward towards the face at the sides to cover the sides of the prosthetic to further help camouflage it while also looking very true to the late Victorian look.
  20. I then pin the ends of the hair to sit over the ears and back into the bun which I secure with bobby pins.
  21. Lastly, I ask my model to put in her dental fang prosthetic on to her teeth to finish of the vampire look. 

Sunday, 6 March 2016

Technical File - Hair Practice


Method:

Section the back half of the hair and tie it in a pony-tail. Plait it and tie off the end. 
Twist it around on itself into a bun and secure it with bobby pins. 
Part the front section down the middle and set the hair directionally with heated rollers. 
Once they are cooled, take them out and use the height and shape given to dress it around the front sides of the face which will be used to help disguise my prosthetic. Tuck the ends of each half of the front around the bun and pin it in.


Evaluation:

Overall, I am happy with this practice and confident with putting the hairstyle together quickly and efficiently. My method creates the appearance that I want. My styling in this practice doesn't look particularly refined and this is something I will need to work on although I am aware that the hair on this doll head is quite damaged which impacts it. 

Saturday, 27 February 2016

Second Practice


With this practice, I am far happier with the outcome compared to my first one. I have completely changed my approach, with a much more natural use of colour, instead of theatrical and almost cartoon-like. I also feel this will be much easier to replicate as the colours are simple.

Also with this practice, I have used my fang prosthetic, where I melted the mold that goes inside using boiling water, inserted it into the piece and then into the mouth. This was successful first time and I feel that it definitely enhances the impact of my design overall. 

I feel that the more subtle and better blended use of red on the lips and eyes means that it is more authentic to the period as a bold lip would not have been seen during this time.

I am not 100% please with my blending of the prosthetic edges, but as this is a reused piece from my first practice, and is the piece with the thickest edges, I expect the piece that I will use on the day to look much better. Including the outcome of the colour as I had to try to wash off the previous colour i had put on it and cover it with the new.

Thursday, 25 February 2016

Prosthetic Painting Part 2


After being unhappy with the outcome of my first practice of my initial design, I needed to remove the make-up of my practice prosthetic and test my new design concept. After finding the outcome to be too bold and theatrical, and definitely not suitable for film, I had to rethink my approach. After considering my options and also the products I already have available to me, I came up with a new idea.
I wanted my new design to be a lot more natural in appearance, and for the prosthetic to look as matching to the skin it is applied to as possible. Part of my read for originally opting for white Supracolor was the thick, grease-based and creamy consistency which provided a coverage thick enough to make the complexion of my model and the prosthetic as much of a close match as possible.
I then realised that the answer was very obvious and simple:- Kryolan's Ultra foundation palette. This gave me enough of a range of highlight and shade tones and also allowed me to pick a shade that was both natural and human-like but also pale. As well as this, the consistency is thick enough and easily bendable that I could create the outcome that I wanted.
Once I decided on this, I painted my prosthetic using regular beauty brushes and the foundation, using darker shades in the deep areas and lighter shades in the higher parts, with a pale shade as the base. 
Once I had done this, I did another make-up practice on my model to test the new outcome, and was very please with the result:

(prosthetic before and after)

Wednesday, 24 February 2016

First practice


Overall, I am not very happy with this outcome. I found it almost impossible to achieve the same colour on the prosthetic as on to the natural skin and then  I also found that the same with the shading, practically outlining the edges of the prosthetic with colour making it obvious. The redness around the eye looks pinkish in colour and the lips too bold for the period. I mixed black and white greasepaint and it looked blueish in colour. Overall, this looks very theatrical and not at all suitable for film. I feel this is mostly due to the boldness of the shades and their application. Therefore, I need to rethink my approach. I am currently considering a more natural and human-like shade as the base, like a very pale foundation. I then would like to use grease-based darker foundation shades to add shading as I think this will look a lot more realistic. I also plan to use greasepaint instead of eyeshadow around the eyes which I will blend lots to create a softer and more natural effect. I am also going to use a softer shade of red (more rouge like) on the lips to be more authentic to the victorian era.

Tuesday, 23 February 2016

Prosthetic Painting

Below is my current design idea for the make-up. I have sourced an appropriate prosthetic, which I have 3 of - One for practicing with, one for the first assessment and one for the second. I have decided to paint 1 of my prosthetics, to test if I feel that my approach with colour and highlight & shade is appropriate and to see how it translates to a real face. I will be doing my first ever practice tomorrow, so I will be able to judge it's success.


Below is a before and after comparison of my piece painted. I have done only a basic and general application colour to save time, and hope that with my practice, i'll be able to incorporate new shadows to help blend the prosthetic with my model's own face shape.


Sunday, 21 February 2016

Technical File - Hair Design Initial Idea Practice and Outcome


After some discussion with Helen, I realised that my hope to do a typical late Victorian Hairstyle (as shown in previous Technical file practice) was far too adventurous to fit into my time frame, particularly as I hope to do quite a complex make-up. Therefore, I have chosen a hairstyle which is much simpler and requires less heat setting etc.

The pictures above are of a general shape which Helen put together to help bring an idea to life, which I am adapting further to create a style that would be true to the Victorian era but also be quite simple.

Below is a drawn and adapted version of my idea, which I will later practice on my model properly using her length of hair as this will be influential in my approach to the style: